

How To Draw A Pilgrim
Celebrate Thanksgiving with a modeled drawing lesson that is simple and fun for students. Once the drawings are finished, students can get creative as they color them. Consider displaying the completed, mounted artwork on a bulletin board.
What You Need:
- White or manila drawing paper
- Pencils
- Erasers
- Crayons
- Scissors
- Glue
- Black markers
- Optional: construction paper, 12- by 18-inch, any color
What You Do:
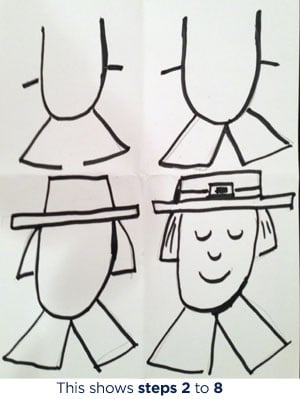
- You will model steps 2 through 8 in front of the class, with children completing each step along with you.
- Begin by drawing a large U for the head in the center of the paper, leaving room at the top of the paper for the pilgrim's hat.
- At the middle of each side of the U, draw a short perpendicular line, which is the start of the hair. Then, on each side of the U, draw up from the short perpendicular lines to the top of the U to outline the hair.
- Draw two incomplete rectangles, angled away from each other, from the bottom of the U, to create the collar.
- Draw a thin rectangle across the top of the U for the hat brim, then draw a thicker rectangle (almost a square) above it for the top of the hat.
- Detail the hat by adding a square buckle in the middle, with a line extending from each side to suggest a ribbon.
- Add short vertical lines to each side to detail the hair.
- Draw two small Us to create (closed) eyes, one small U to represent the nose, and a larger, wider U for a mouth shape.
- Have students color their pilgrims with crayons.
Optional: Have students cut out the pilgrim boy and glue it on a sheet of construction paper. Students may want to outline the pilgrim boy with a black marker.
How To Draw A Pilgrim
Source: https://www.scholastic.com/teachers/articles/teaching-content/pilgrim-boy-modeled-drawing-lesson/
Posted by: felixforridgen.blogspot.com
0 Response to "How To Draw A Pilgrim"
Post a Comment